It has been a couple weeks since my last post. This is not because I am lazy, cooking less, uninspired or having blogger block, it is because after months.....actually maybe a year or so of undiagnosed abdominal pain, I think I have made a discovery. Last weekend I met up (while both of us were travelling separately for work) with my wife in Chicago, our hometown, to visit with family. We met for dinner with family including one of Catherine's cousins, D-. While ordering, D- ordered a gluten free pizza. We asked her if she was celiac, and she was. She had pain similar to mine and had spent months seeing several doctors without a diagnosis. She was turned on to a gluten free diet and all pain went away. She has never been happier and healthier. After thinking about this, and quite frankly hoping it would not be my cure (since I love pasta and bread, oh, and beer; being a homebrewer and all) I spent a few days gluten free and my pain went away.
So...this blog seems to be starting at the right time of my life. Yes, there are many gluten free blogs, but I am in a unique position to be starting my gluten free lifestyle, and you get to start on this journey with me. You can experience this and experiment this with me.
I am not a chef, just a guy who loves to cook. It is very relaxing for me to come home after work and dice celery, onions, bell peppers; make a roux of oil and flour; stir arborio rice for an hour to make a wonderful mushroom risotto.
So after reading several blogs, websites and books over the past few days I learned a lot about how to replace those things I cannot eat with those I can.
One thing I have been trying to make over the past few months is the brownies my mom made for me as a kid. She passed away when I was in high school and I have not had those brownies since. She used cocoa, not chocolate. So I searched websites including the Hershey's site to find the recipe, to no avail. But today I started reading the 'gluten free everyday cookbook' by Robert M. Landolphi. In his awesome cookbook there is a recipe for 'WOW! Brownies'. These were not like my mom's, but the recipe gave me the GF basics. I substituted the bittersweet chocolate for cocoa and the whole eggs for egg whites and I think I am pretty close to what mom used to make.
I did not take pictures since I was not sure how this would turn out, but it was much better than I thought. So here is the recipe....pictures to follow.
Mom's brownies, GF style
1 1/2 sticks butter
1/2 cup cocoa
2 cups sugar
5 egg whites
1 teaspoon vanilla
1 cup GF flour (Bob's Red Mill makes amazing products)
Preheat oven to 350 degrees. Butter a 9 x 13 - inch baking pan.
In a small saucepan melt butter over low heat. When melted, slowly add whipped egg whites and vanilla to the pan.
In a separate large bowl mix all dry ingredients; cocoa, sugar, and flour.
Add butter mix to the dry mix until well blended. Pour the mixture into the prepared pan and spread evenly with a rubber spatula. Bake for 40-45 minutes, or until a toothpick inserted comes out clean. Remove from the oven and let cool completely in the pan. Cut into bars and serve.
Tuesday, November 23, 2010
Thursday, November 11, 2010
Mustard
We ended up going to a great little restaurant called Pause. She had a cuban sandwich and along with it was a great tasting aioli mustard. Catherine was so excited and liked it so much that she was using her finger to scrape out the mustard and then licked her finger clean. Just eating finger scoops of the mustard. I am sure she would be devastated to know that I just told you that. Hmmm.
At the same time I was having a housemade sausage with housemade sauerkraut with bacon in it and what was on the side but a very yummy whole grain German style mustard. While I did not use my fingers, I scooped all the mustard out of the ramekin, leaving it clean.
It was odd, this lust over mustard, since I had just been thinking about making mustard and giving it away as gifts during holiday parties. Everyone likes homemade gifts, especially food.
Mustard is really easy to make and far superior to those you buy in the groceries.

Whole Grain and Roasted Garlic Mustard
adapted from Eating Well
Ingredients
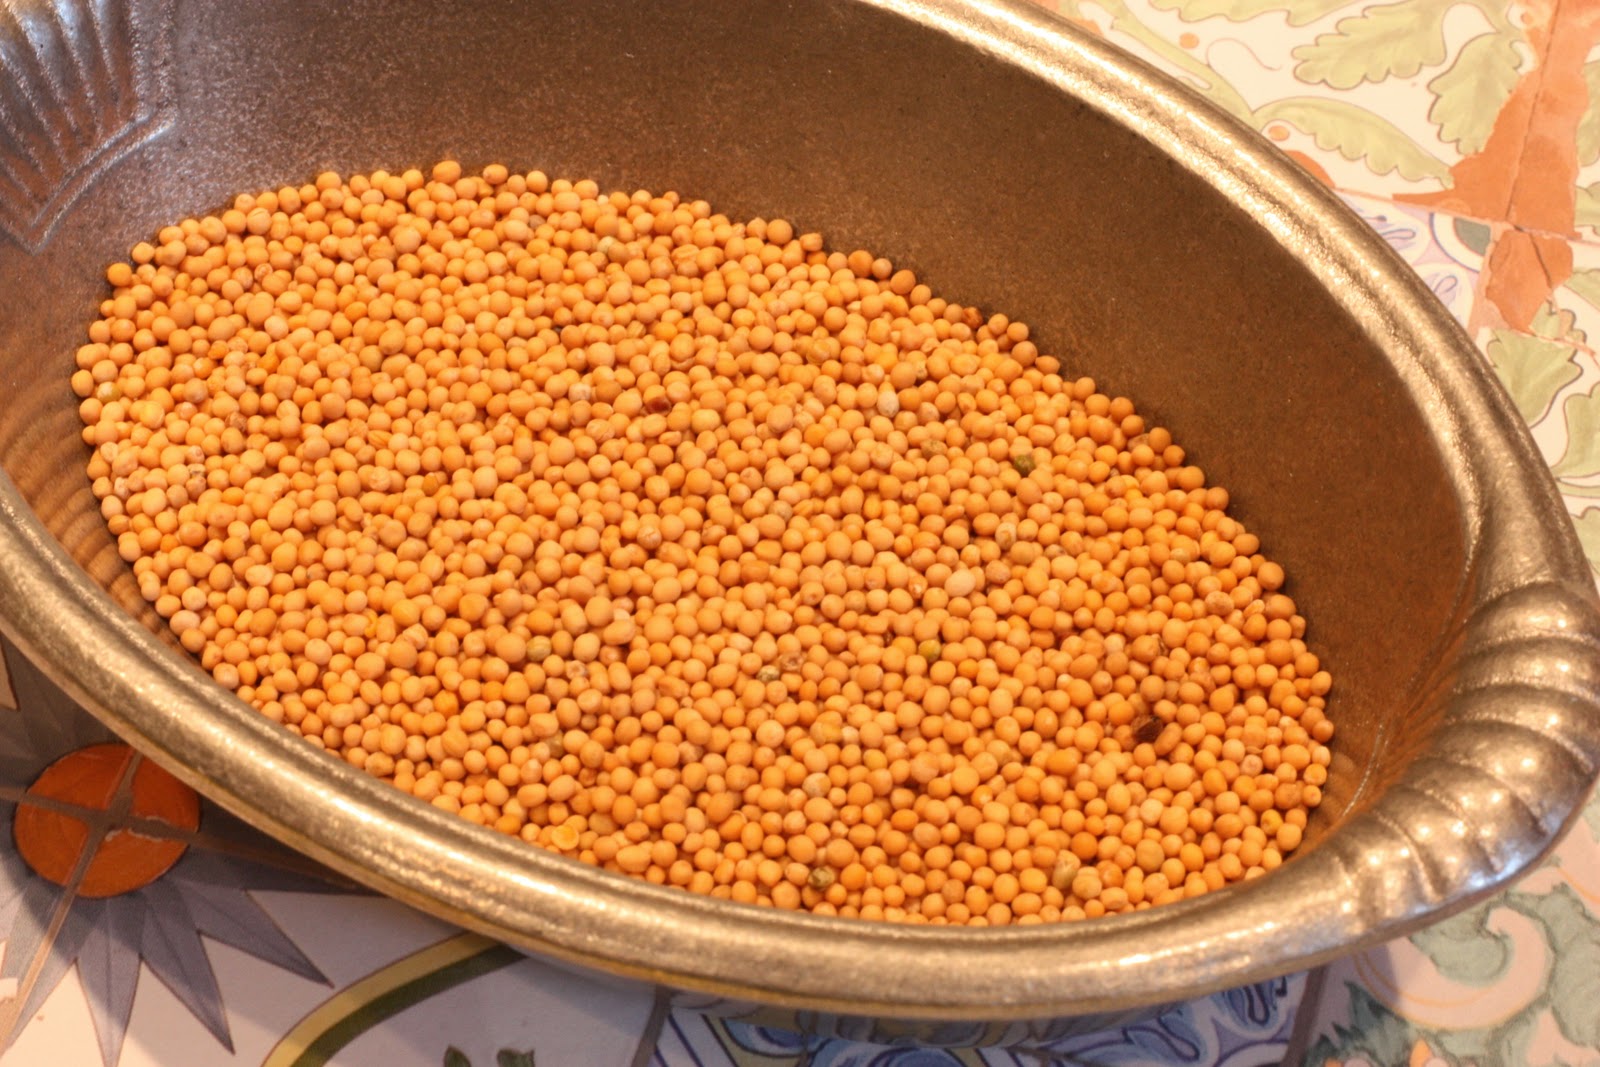
- 2 1/4 cups whole yellow mustard seeds
- 3/4 cup whole brown mustard seeds
- 2 1/2 cups cider vinegar
- 1 1/2 cups water
- 1 head garlic
- 1 teaspoon extra-virgin olive oil
- 1/4 cup pure maple syrup
- 1/4 cup blue agave (or use 1/2 cup of either syrup or agave)
- 2 tablespoons salt
Preparation
- Combine yellow and brown mustard seeds, vinegar and 1 1/2 cups water in a large bowl; cover and let stand at room temperature until the liquid is mostly absorbed, about 6 hours.
- About an hour before you’re ready to make mustard, preheat oven to 400°F. Rub off the excess papery skin from garlic without separating the cloves. Slice the tip off the head, exposing the cloves. Place the garlic on a piece of foil, drizzle with oil and wrap into a package. Place the package directly on the oven rack and roast until the garlic is very soft, 40 minutes to 1 hour.
- When the garlic is cool enough to handle, squeeze half of the cloves out of their skins into a blender. Add half of the mustard seed mixture and pulse, stopping to scrape down the sides as necessary and adding water by the tablespoon as needed to facilitate the blending, until some of the seeds are coarsely chopped and the mixture looks like grainy mustard. Transfer to a large bowl. Repeat with the remaining roasted garlic and mustard mixture and add to the bowl. Stir in syrup, agave or both and salt.
- Spoon the mustard into airtight containers and refrigerate.
- Refrigerate in airtight containers for up to 1 month (it will not last this long).

Sunday, November 7, 2010
Sugo
I found it fitting to start this blog with one of my most favorite meals; pasta with red sauce. I think it goes back to my childhood years spending time with my best friend N- and his family. I remember those days like they were yesterday, not 30 years ago. We were growing up in Illinois, where the winters are long, and would sit around the dining room table with bowls of steaming pasta with sugo (meat sauce) and rabbit. N-'s parents, grandma, brother, sister and us, I felt like I was part of the famly. His parents and grandma were from Sicily, Italy and brought with them the best recipies. I have tried many different sauces in the many years since but have never come close to those flavors and smells I remember from my childhood.
I have used canned tomatos; crushed, diced and whole, grown my own san marzanos, cooked then, crushed them in a food mill and bought plum, diced and cooked until broken down. I have tried using minimal spices, a lot of spices, balsamic vinegar, a little olive oil and a good 1/2 cup or so of oil.
In all this trail and error I have come up with a few good sauces and of course some not so good. But, last night I thought I would do something a bit different after watching America's Test Kitchen. We were just talking about having a simple meal and Christopher Kimball came on the screen to talk about a creamy tomato sauce and I knew what we were having for dinner. As we watched the show we were getting more and more hungry and the finished sauce looked wonderful. It has my favorites; tomato, prosciutto and red pepper flakes and since we always have everything in this ingredient list in our pantry we did not need to run to the market for anything. This has a really layered flavor since it uses tomatoes in different forms; paste, sundried and crushed:
Creamy Tomato Sauce

Ingredients

Enjoy!
I have used canned tomatos; crushed, diced and whole, grown my own san marzanos, cooked then, crushed them in a food mill and bought plum, diced and cooked until broken down. I have tried using minimal spices, a lot of spices, balsamic vinegar, a little olive oil and a good 1/2 cup or so of oil.
In all this trail and error I have come up with a few good sauces and of course some not so good. But, last night I thought I would do something a bit different after watching America's Test Kitchen. We were just talking about having a simple meal and Christopher Kimball came on the screen to talk about a creamy tomato sauce and I knew what we were having for dinner. As we watched the show we were getting more and more hungry and the finished sauce looked wonderful. It has my favorites; tomato, prosciutto and red pepper flakes and since we always have everything in this ingredient list in our pantry we did not need to run to the market for anything. This has a really layered flavor since it uses tomatoes in different forms; paste, sundried and crushed:
Creamy Tomato Sauce

Ingredients
- 3 tablespoons unsalted butter
- 1 ounce prosciutto , minced (about 2 tablespoons)
- 1 small onion , diced fine (about 3/4 cup)
- 1 bay leaf
- Pinch red pepper flakes
- Table salt
- 3 medium garlic cloves , minced or pressed through garlic press (about 1 tablespoon)
- 2 tablespoons tomato paste
- 2 ounces oil-packed sun-dried tomatoes , drained, rinsed, patted dry, and chopped coarse (about 3 tablespoons)
- 1/4 cup plus 2 tablespoons dry white wine
- 2 cups plus 2 tablespoons crushed tomatoes (from one 28-ounce can)
- 1 pound pasta (I now use gluten-free)
- 1/2 cup heavy cream
- Ground black pepper
- 1/4 cup chopped fresh basil leaves
- Grated Parmesan cheese , for serving
Instructions
- 1. Melt butter in medium saucepan over medium heat. Add prosciutto, onion, bay leaf, pepper flakes, and 1/4 teaspoon salt; cook, stirring occasionally, until onion is very soft and beginning to turn light gold, 8 to 12 minutes. Increase heat to medium-high, add garlic, and cook until fragrant, about 30 seconds. Stir in tomato paste and sun-dried tomatoes and cook, stirring constantly, until slightly darkened, 1 to 2 minutes. Add 1/4 cup wine and cook, stirring frequently, until liquid has evaporated, 1 to 2 minutes.
- 2. Add 2 cups crushed tomatoes and bring to simmer. Reduce heat to low, partially cover, and cook, stirring occasionally, until sauce is thickened (spoon should leave trail when dragged through sauce), 25 to 30 minutes.
- 3. Meanwhile, bring 4 quarts water to boil. Add pasta and 1 tablespoon salt and cook until al dente. Reserve 1/2 cup cooking water; drain pasta and transfer back to cooking pot.
- 4. Remove bay leaf from sauce and discard. Stir cream, remaining 2 tablespoons crushed tomatoes, and remaining 2 tablespoons wine into sauce; season to taste with salt and pepper. Add sauce to cooked pasta, adjusting consistency with up to 1/2 cup pasta cooking water. Stir in basil and serve immediately, passing Parmesan separately.

Subscribe to:
Posts (Atom)